In this blog post I will recommend and go through how to set up your very own travel router, which you would connect to an existing network and have your very own (secure) wifi network no matter where you go.
The travel router I recommend is the GL.iNet GL-AR300M, which is – in one-line (provided by Amazon.com) – a “Mini Travel Router, Wi-Fi Converter, OpenWrt Pre-installed, Repeater Bridge, 300Mbps High Performance, 128MB Nand flash, 128MB RAM, OpenVPN, Tor Compatible, Programmable IoT Gateway”.
It is ~$35 USD or ~$48 CAD: Amazon.com | Amazon.ca

I linked the internal antenna model of this router, which in my opinion is ideal as it is more compact than the external antenna model.
Prior to purchasing the AR300M, I looked at various mainstream travel routers, such as TP-Link’s TL-MR3020, but ultimately decided that the AR300M is the best value and superior travel router based on its processor, build, storage space, and features. I particularly like how it’s powered by a Micro USB cable, which means you can easily plug it into a laptop or bring along a USB/AC charger, instead of other travel routers that plug directly into a power socket and are clunky and less flexible in terms of physical placement.
It accepts 4 internet sources:
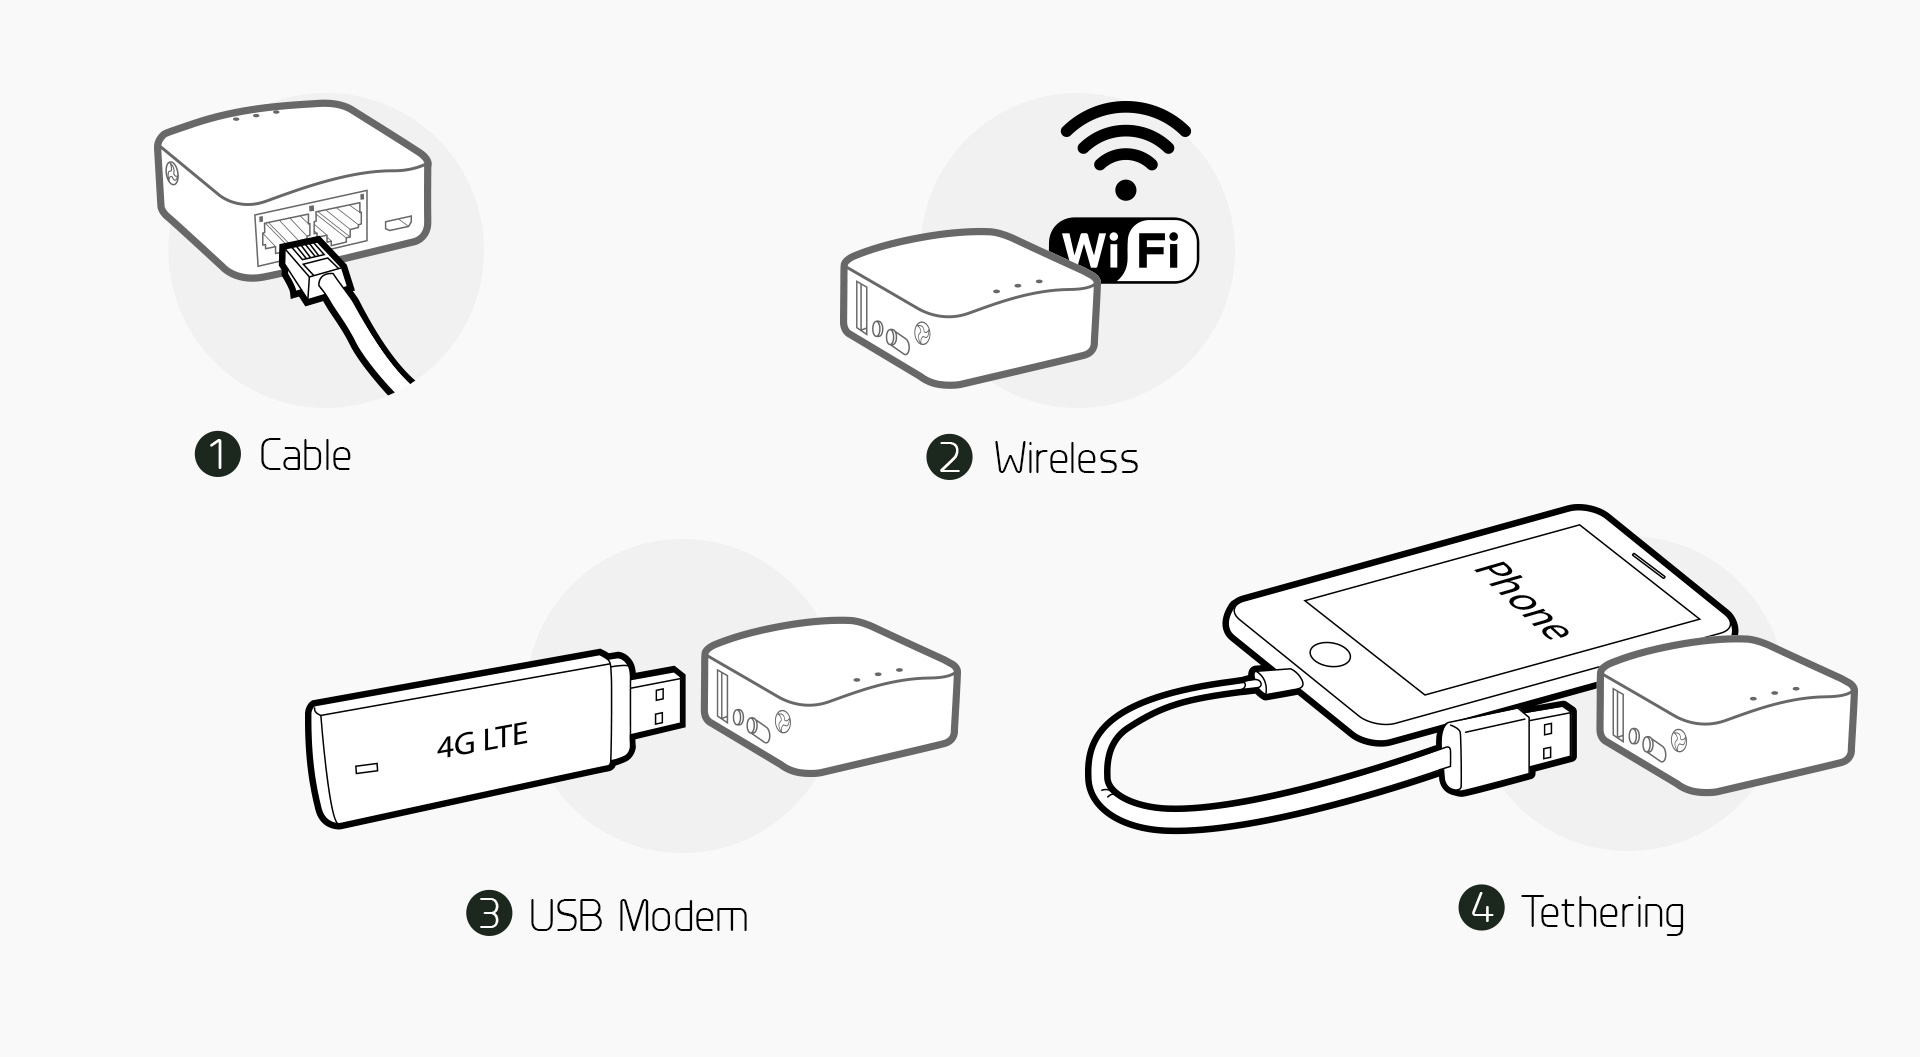
More importantly, it supports VPN out-of-the-box.
I’ll go through how to set up the AR300M with some personal recommendations sprinkled in for added security and privacy. In the end, you’ll have a palm-sized box you can connect to an existing network – through a physical wire, USB modem, tethering using a mobile device, or even wirelessly – and have your very own secure wireless network. All devices connected to your wireless network will have all sent/received data encrypted. If you use a VPN set up according to my guide on creating your own superpowered VPN server, you will also have ads and trackers blocked for all devices.
Getting Started
- Unpack the box
- The box contains: the AR300M, a Micro USB cable, and a getting started sheet
- Plug the Micro USB cable into the AR300M and plug the other end into either your computer, or a USB charger
- Get your own ethernet cable, plug it into the LAN port on a router and plug the other end into the WAN port of the AR300M
- The left-most light on the AR300M should be solid green. Wait for the right-most light to turn a solid red/orange. For future reference, this is how you’ll know you can access it over wifi
- On a computer, look for and connect to a wireless network called: GL-AR300M-***
- Connect using the default password: goodlife
- Once connected, open your internet browser and go to http://192.168.8.1/
- Choose between Chinese or English
- Select your Timezone
- Set a Password for the router (note: also used for SSH)
- Under “Settings“, click on “Firmware“
- Use the autodetected firmware upgrade to upgrade to the latest version (as of this posting the latest is v2.26)
- Ensure that “Keep settings” is unticked
- If it is not at least v2.26 and for any reason doesn’t prompt you to upgrade, manually download the latest .TAR file from: http://www.gl-inet.com/firmware/ar300m/nand/v1/
- Allow it to upgrade, then once you see the GL-AR300M-*** wireless network again, repeat steps 6 to 11
Now that we have our AR300M on the latest firmware, let’s set it up!
Configure the Router

For advanced users, GL.iNet has created a simplified interface (the blue interface pictured above) on top of OpenWRT.
Below are my recommended settings:
- Disable Auto-upgrade: ensure Auto-upgrade is disabled under Settings => Firmware to avoid having the box automatically upgrade itself while you’re travelling. It should already be disabled by default, but I am mentioning this just to reiterate.
- Disable WAN access: found under Settings => the third icon (key hole icon). It should already be disabled by default.
- Change Wireless Settings: found under Settings => the second icon (wireless radio icon).
- Click on “Setting“:
- Mode: 300M
- Channel: Auto (or a fixed channel of your choice; I recommend channel 1)
- Security: WPA2 only (not “WPA/WPA2”)
- Name: set it to what you want your devices to see
- (optional) Click on “LAN IP“:
- Change 192.168.8.1 to 10.x.x.1 to avoid the likelihood of conflicting with host routers (e.g. set it to 10.123.123.1)
- Important: remember what you change the LAN IP to as you will need it to access your router settings
- Click on “Setting“:
- Disable UPnP Server: click on “UPnP server” in the top horizontal navigation menu and disable it.
- Change Device Name: go to http://192.168.8.1/ (or to the LAN IP you changed it to), click on “Advanced settings >>” at the top of the page, type in the password you set when setting up the AR300M, go to Network => Interfaces and click on the Edit button for WAN, and set an unassuming name for “Hostname” which host routers will see.
- I recommend either localhost or android-**lowercasemacaddress**, such as android-93c7edfdb42e (generate your own using this page: use the last format option (0010FA6E384A), and set to lowercase).
If you stop here, you have a fully-functioning travel router that you can use to set up your own wireless network no matter where you are. However, you’ll be at the mercy of the host network you’re connected to.
Let’s go further and add VPN into the mix, which will encrypt and securely route all traffic from devices connected to the AR300M through a VPN so that your host network and/or its Internet service provider can’t snoop on your traffic.
Set up VPN
Install and Configure stunnel
If you followed my guide on creating your own superpowered VPN server, follow the steps below. If not, skip this section and go below to “Upload VPN Profile(s)“:
- Get a USB stick and copy the stunnel.crt file created from my guide into the root folder of your USB
- Plug the USB stick into the AR300M
- Download PuTTY from https://www.chiark.greenend.org.uk/~sgtatham/putty/latest.html (under “putty.exe (the SSH and Telnet client itself)”)
- Open it and enter 192.168.8.1 (or to the LAN IP you changed it to) in the Host Name box, and leave Port as the default value (port 22)
- Click on the Open button
- When prompted for a username, type in: root
- When prompted for a password, type in the password you set when setting up the AR300M
- If you logged in successfully, you should now see a command prompt
- Run:
chmod 777 /dev/net/tun
opkg update
- Once completed, run:
opkg install stunnel
- Once that is done, run:
vi /etc/stunnel/stunnel.conf
- Press i on your keyboard (to enter insert mode), and delete everything after the “; Starting here, enter your services or uncomment the examples” line (e.g. use the arrow keys to point the cursor after the line and hold down DEL until everything after has been deleted)
- Type in the following:
[vpn]
client = yes
accept = 127.0.0.1:1194
connect = YOURSERVERIP:443
CAfile = stunnel.crt
- Change “YOURSERVERIP” to your VPN server IP address
- Press ESC
- Press :, then w, and then q (to type in :wq)
- Press Enter to save the file
- Run:
cd /mnt && ls
- Make note of the name of your USB that appears
- Run:
cd YOURUSBNAME
- Run:
cp stunnel.crt /etc/stunnel/
- Open your internet browser and go to http://192.168.8.1/ (or to the LAN IP you changed it to)
- Click on “Advanced settings >>” at the top of the page
- Type in the password you set when setting up the AR300M
- Go to System => Startup
- Find stunnel in the list and press the Restart button
Upload VPN Profile(s)
If you’re already with a VPN provider check or inquire if they offer .OVPN profiles. If you are in need of a VPN provider, take a look at https://thatoneprivacysite.net/vpn-comparison-chart/ and focus on those with “Yes” under “Offers VPN”.
Once you have a VPN profile in your hands, you can proceed to load it into AR300M.
- Open your internet browser and go to http://192.168.8.1/ (or to the LAN IP you changed it to)
- Go to Settings => the first icon (globe icon)
- Click on the Custom DNS button
- If you followed my guide on setting up a VPN server, in the first box enter: 10.8.0.1
- Leave the second box blank
- If your VPN provider provided you with DNS servers, you can input the IP address(es) in the boxes
- If not, you can use two OpenNIC DNS servers; worst-case you can use Google DNS: 8.8.8.8 and 8.8.4.4
- If you followed my guide on setting up a VPN server, in the first box enter: 10.8.0.1
- Tick “Force all clients to use“
- Click on the Apply button
- Click on “OpenVpn” in the top horizontal navigation menu
- Upload your .OVPN profile (you can upload more than one profile)
- Refresh the page
- You should now see an enable checkbox, no internet if vpn disconnected checkbox, and a dropdown
- Tick both checkboxes and select the desired profile from the dropdown and then click on the Apply button
Once working, you will see an self-updating status message below the Apply button you clicked with the OpenVPN status, and in/out traffic amounts.
Set the AR300M LED Light to represent VPN Status
- Open your internet browser and go to http://192.168.8.1/ (or to the LAN IP you changed it to)
- Click on “Advanced settings >>” at the top of the page
- Type in the password you set when setting up the AR300M
- Go to System => LED Configuration
- Add/modify a configuration entry for the VPN to match the settings below:

- Click on Save & Apply
The middle LED light on the AR300M will now be a solid green when successfully connected to VPN and will blink when there is VPN activity. This is extremely handy to know whether or not a VPN connection was successfully established without having to log into the web interface.
Testing
To test that your VPN is working, you can go to www.dnsleaktest.com